Replace Register/Login Page
Description
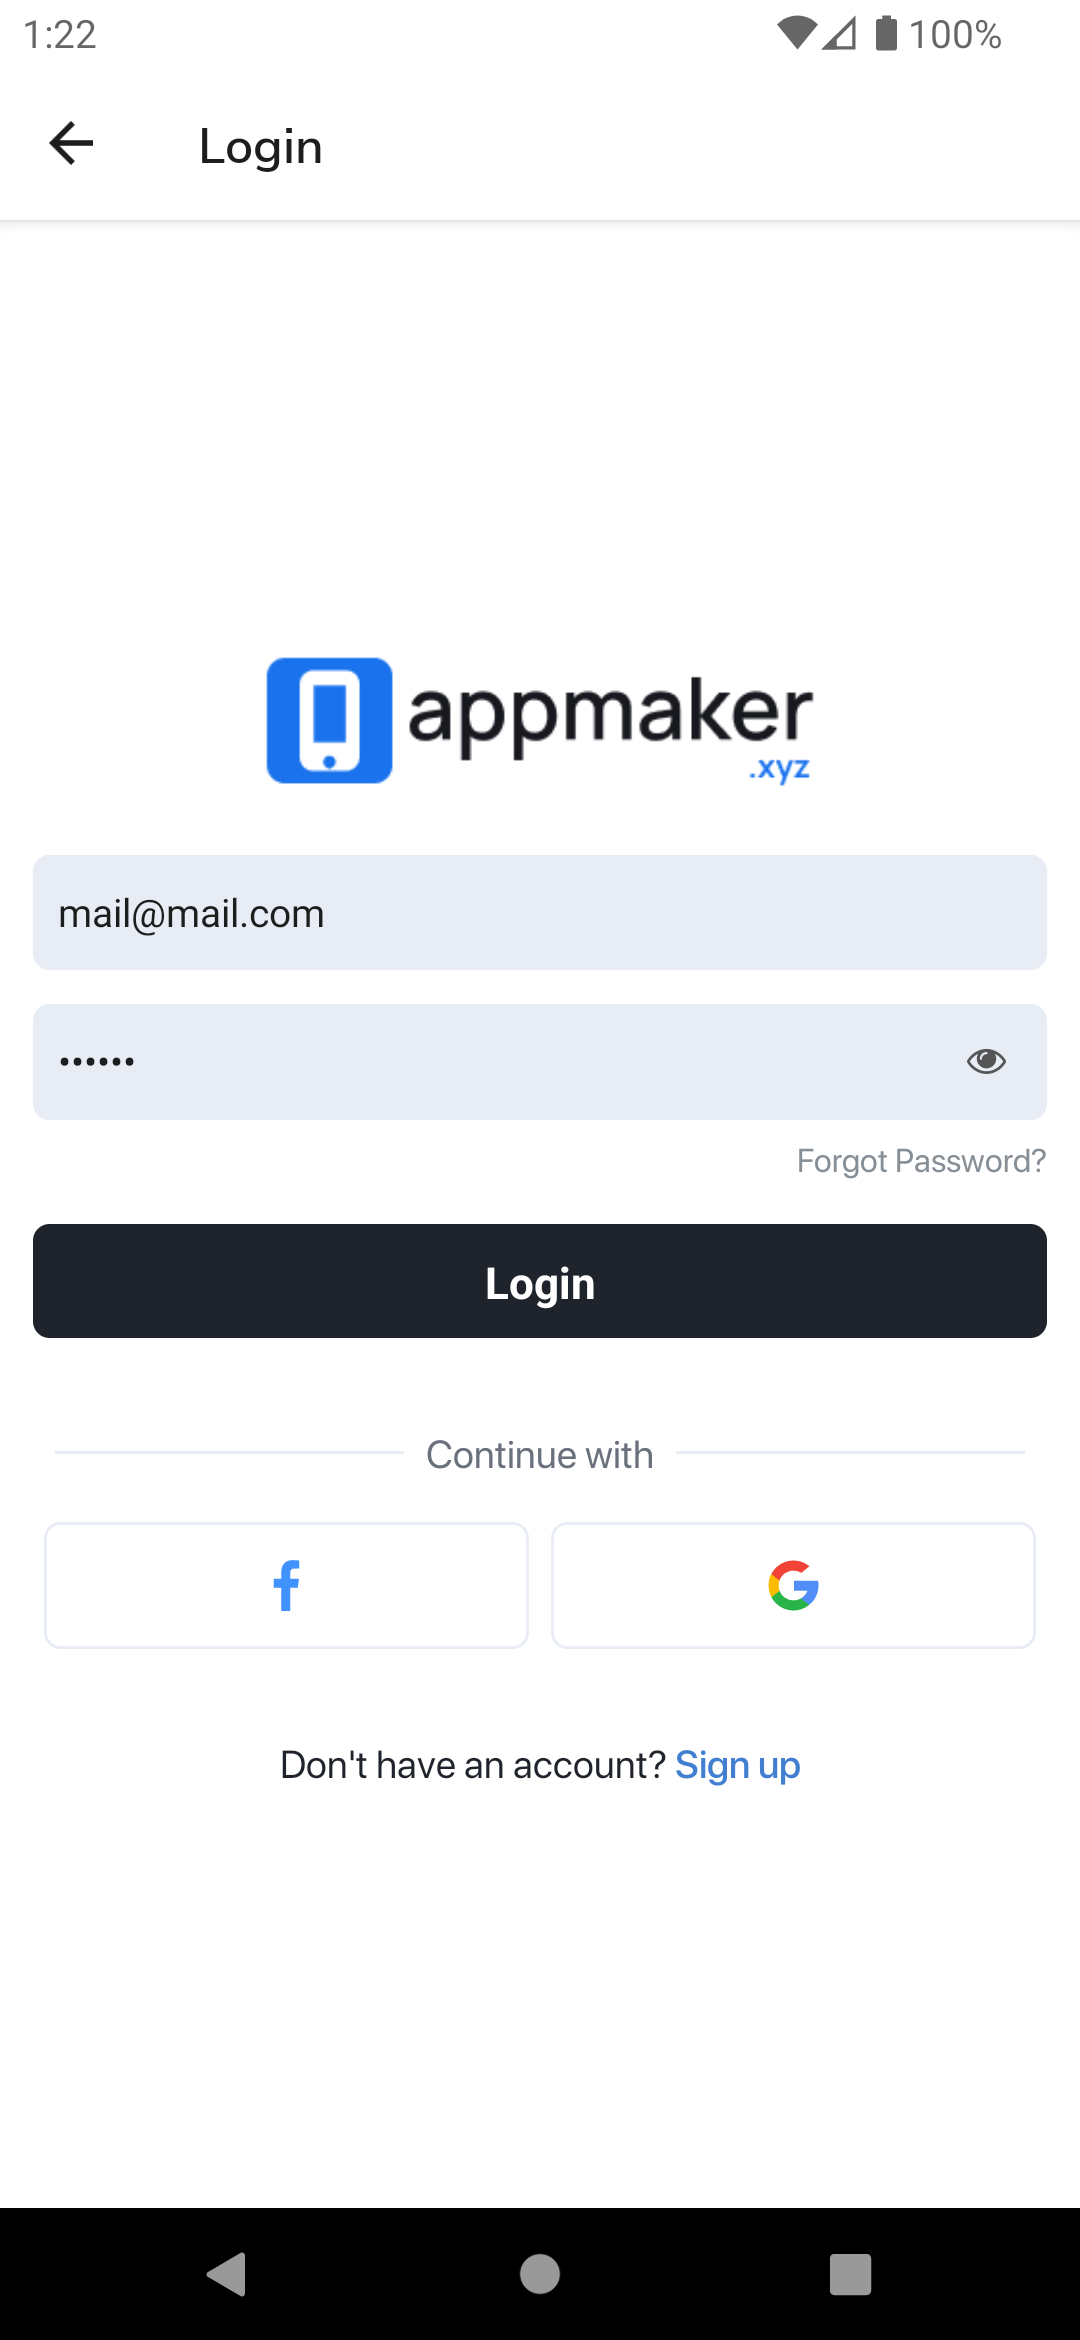
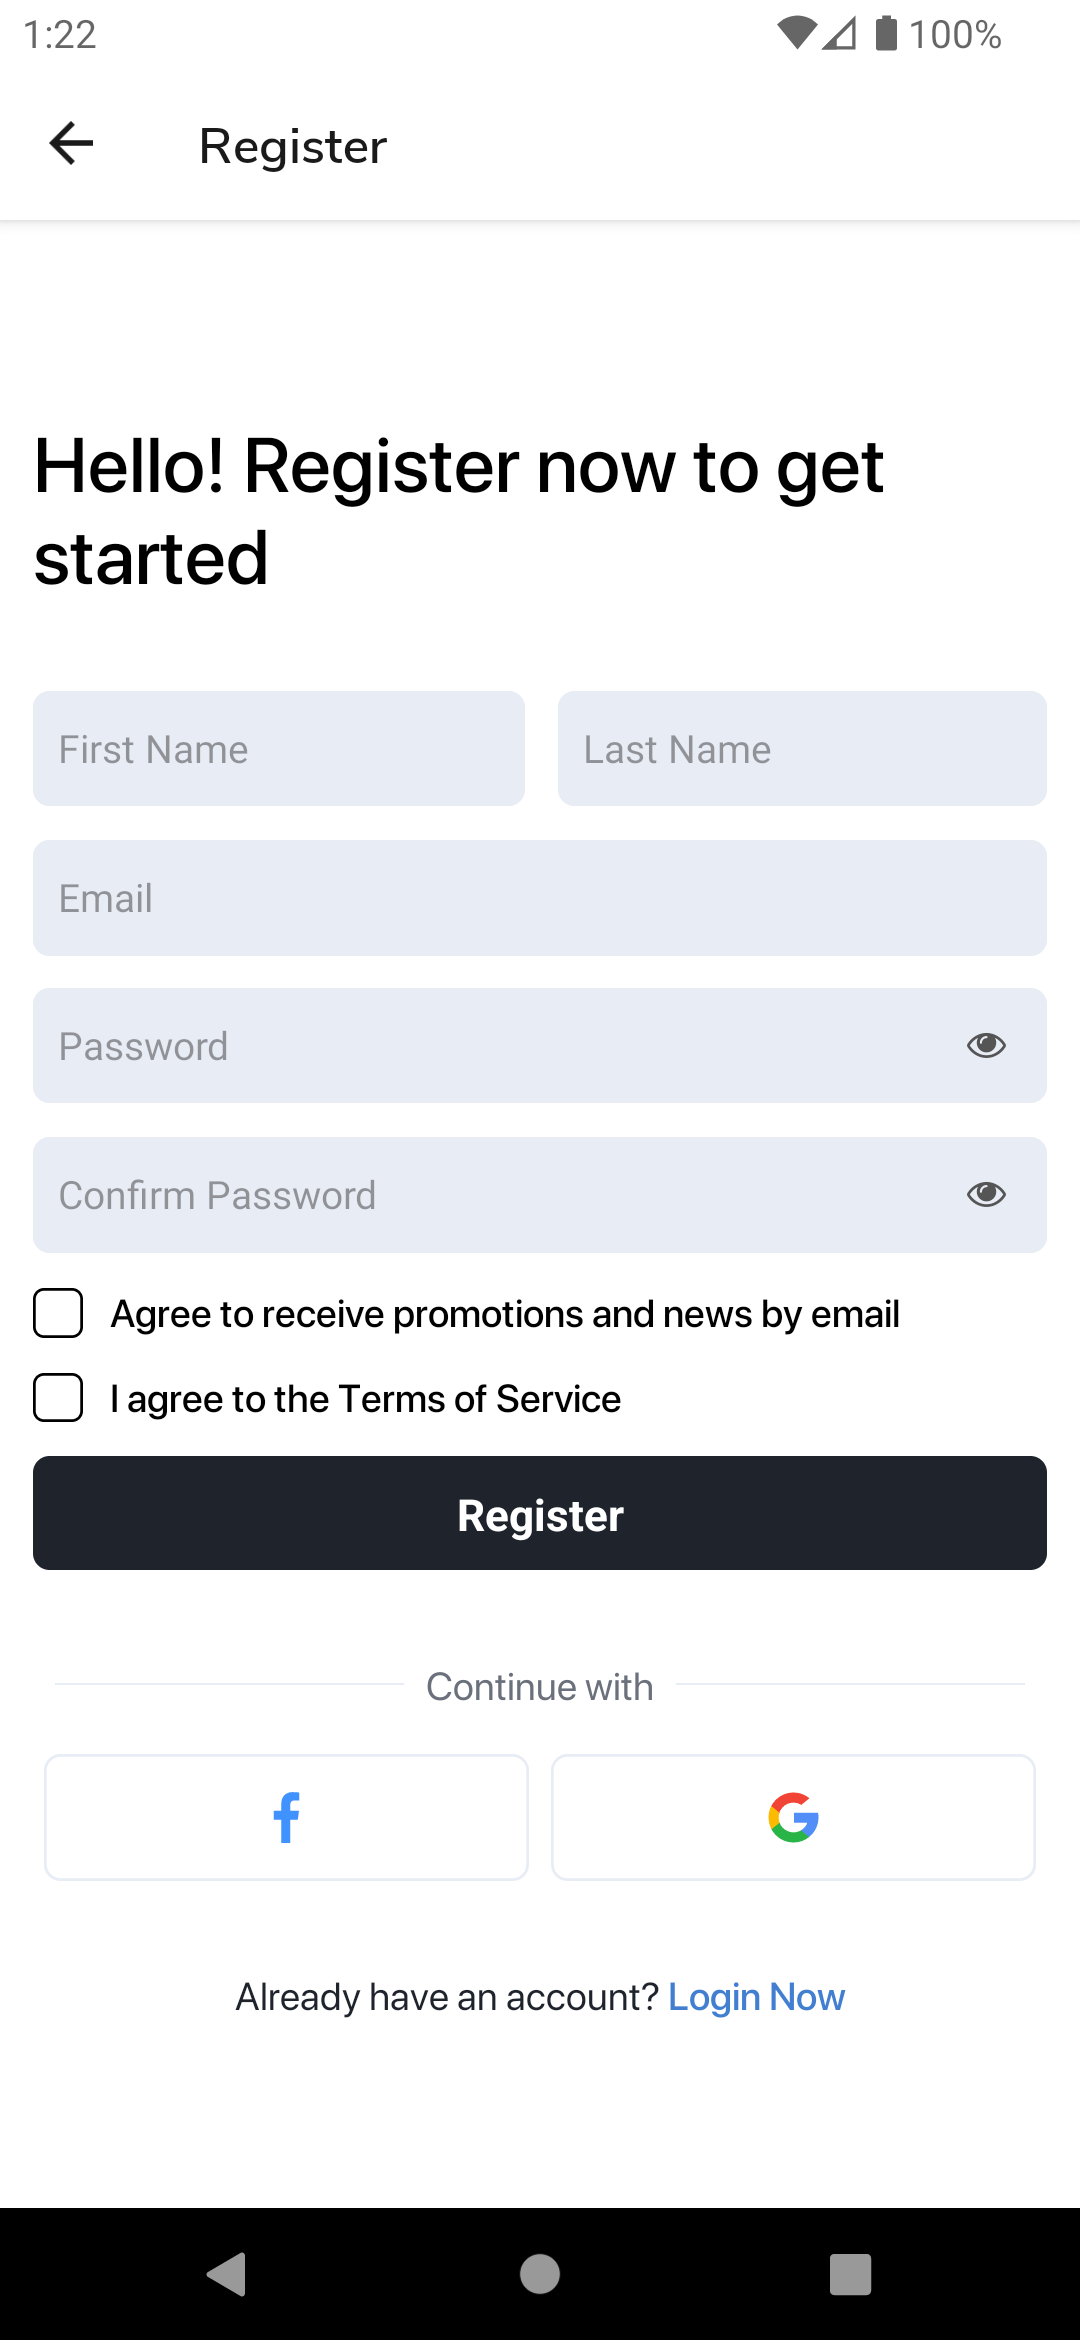
This document provides instructions on how to substitute the default register/login page with a custom component. This is particularly valuable when you want to incorporate personalized elements into the register/login page, such as a custom header, footer, or custom form fields.
Example


Create form input components
As a first step, you need to create form inputs for the pages going to be replaced. This is important to manage the form state and to validate the form inputs.
Create a Text Input component
Create a file named
InputFormItem.tsxin thesrc/components/user/form-blockfolder.Add the following code to the
InputFormItem.tsxfile.
import React from "react";
import { Control, Controller } from "react-hook-form";
import {
  TextInputProps,
  TextInput,
  View,
  Text,
  StyleSheet,
} from "react-native";

type Props = {
  control: Control;
  name: string;
  label: string;
  style?: any;
} & TextInputProps;
export function InputFormItem({
  control,
  name,
  label,
  style = {},
  ...props
}: Props) {
  return (
    <Controller
      control={control}
      name={name}
      render={({ field: { onChange, value, onBlur }, fieldState }) => (
        <View style={styles.container}>
          <TextInput
            value={value}
            onChangeText={onChange}
            style={styles.input}
            {...props}
          />
          {fieldState.error && (
            <Text style={styles.errorText}>
              {fieldState.error && fieldState.error.message}
            </Text>
          )}
        </View>
      )}
    />
  );
}

const styles = StyleSheet.create({
  container: {
    marginBottom: 12,
  },
  input: {
    backgroundColor: "#E8ECF4",
    padding: 10,
    height: 40,
  },
  errorText: {
    color: "#EF4444",
    fontSize: 12,
    marginTop: 2,
  },
});
The InputFormItem component is used to create form inputs for the register/login page. This component is used to manage the form state and to validate the form inputs. You can customize components rendered in the Controller to match your requirements.
Refer to the react-hook-form documentation for your additional requirements.
Create a Checkbox component
Create a file named
CheckboxFormItem.tsxin thesrc/components/user/form-blockfolder.Add the following code to the
CheckboxFormItem.tsxfile.
import React from "react";
import { CheckBox } from "@appmaker-xyz/ui";
import { Control, Controller } from "react-hook-form";

type Props = {
  control: Control;
  name: string;
  label: string;
  style?: any;
};
export function CheckBoxFormItem({ control, name, label, style = {} }: Props) {
  return (
    <Controller
      control={control}
      name={name}
      render={({ field: { onChange, value, onBlur }, fieldState }) => (
        <CheckBox
          small={true}
          label={label}
          onValueChange={onChange}
          value={value}
          error={fieldState.error && fieldState.error.message}
        />
      )}
    />
  );
}
You can customize components rendered in the Controller to match your requirements.
Steps to replace the register page
Create a component named
RegisterForm.jsin thesrc/components/userfolder.Add the following code to the
RegisterForm.jsfile.
import React from "react";
import {
  StyleSheet,
  KeyboardAvoidingView,
  Pressable,
  Text,
  ActivityIndicator,
  View,
} from "react-native";
import { InputFormItem } from "./form-block/InputFormItem";
import { CheckBoxFormItem } from "./form-block/CheckBoxFormItem";
import { useRegister, useNavigationActions } from "@appmaker-xyz/shopify";

const RegisterForm = () => {
  const { control, isLoading, submitRegister } = useRegister({
    defaultValues: {},
  });
  const { openLoginPage } = useNavigationActions();
  return (
    <View style={styles.container}>
      <Text style={styles.title}>Hello! Register now to get started</Text>

      <KeyboardAvoidingView behavior="padding">
        <InputFormItem
          control={control}
          name="first_name"
          placeholder={"First Name"}
        />
        <InputFormItem
          control={control}
          name="last_name"
          placeholder={"Last Name"}
        />
        <InputFormItem control={control} name="email" placeholder={"Email"} />
        <InputFormItem
          control={control}
          name="password"
          placeholder={"Password"}
          autoCapitalize="none"
          autoCorrect={false}
          textContentType="password"
          secureTextEntry={true}
        />
        <InputFormItem
          control={control}
          secureTextEntry={true}
          name="repeat_password"
          placeholder={"Confirm Password"}
          textContentType="password"
        />
        <CheckBoxFormItem
          control={control}
          name="accepts_marketing"
          label="Agree to receive promotions and news by email"
        />
        <CheckBoxFormItem
          control={control}
          name="agree_terms"
          label="I agree to the Terms of Service"
        />
        <Pressable style={styles.button} onPress={submitRegister}>
          {isLoading ? (
            <ActivityIndicator size="small" color="#fff" />
          ) : (
            <Text style={styles.buttonText}>Register</Text>
          )}
        </Pressable>
      </KeyboardAvoidingView>
      <View style={styles.signUpButton}>
        <Pressable onPress={openLoginPage}>
          <Text>
            Already have an account?{" "}
            <Text style={styles.loginText}>Login Now</Text>
          </Text>
        </Pressable>
      </View>
    </View>
  );
};

const styles = StyleSheet.create({
  container: {},
  title: {
    marginBottom: 32,
    fontSize: 32,
  },
  button: {
    alignItems: "center",
    backgroundColor: "#000",
    padding: 10,
  },
  buttonText: {
    color: "#fff",
  },
  signUpButton: {
    marginTop: 32,
    alignItems: "center",
  },
  loginText: {
    color: "#427FD1",
  },
});

export default RegisterForm;
useRegister hook is used to manage the register form state and to submit the register form. useNavigationActions hook is used to navigate to other pages.
Refer to the useRegister and useNavigationActions hooks for more information.
- Register the
RegisterFormcomponent in thesrc/blocks/index.jsfile.
import RegisterForm from "../components/user/RegisterForm";

const blocks = [
  {
    name: "appmaker/register-form",
    View: RegisterForm,
  },
];

export { blocks };
Create a page file named
Register.jsin thesrc/pagesfolder.Add the following code to the
Register.jsfile.
const Register = {
  type: "normal",
  title: "Register",
  attributes: {
    renderType: "normal",
    renderInScroll: true,
    rootContainerStyle: {
      flex: 1,
      backgroundColor: "#FFFFFF",
    },
    contentContainerStyle: {
      flex: 1,
    },
    scrollViewContentContainerStyle: {
      justifyContent: "center",
      padding: 12,
      flexGrow: 1,
    },
  },
  blocks: [
    {
      name: "appmaker/register-form",
      attributes: {},
    },
  ],
};

export default Register;
setting renderType: 'normal' and renderInScroll to true will render the page in a scroll view. Which helps to render the page in a scroll view when the keyboard is open. scrollViewContentContainerStyle is used to style the scroll view content container.
- import the
Registerpage in thesrc/pages/index.jsfile.
import Register from "./Register";

const pages = {
  Register, //name of the page should remain as Register
};

export { pages };
Ensure that you include the pages module within the registerTheme function located in the src/index.js file.
- Check whether the register page is replaced with the custom register page.
Steps to replace the login page
Create a component named
LoginForm.jsin thesrc/components/userfolder.Add the following code to the
LoginForm.jsfile.
import React from "react";
import {
  StyleSheet,
  View,
  Text,
  KeyboardAvoidingView,
  Pressable,
  ActivityIndicator,
} from "react-native";
import { useLogin, useNavigationActions } from "@appmaker-xyz/shopify";
import { InputFormItem } from "./form-block/InputFormItem";

const LoginForm = () => {
  const { control, isLoading, submitLogin } = useLogin({
    defaultValues: {
      email: "",
      password: "",
    },
  });
  const { openRegister, openResetPassword } = useNavigationActions();
  return (
    <View style={styles.container}>
      <KeyboardAvoidingView behavior="padding">
        <InputFormItem control={control} name="email" placeholder="Email" />
        <InputFormItem
          control={control}
          name="password"
          placeholder="Password"
          secureTextEntry={true}
        />
        <Pressable style={styles.forgotButton} onPress={openResetPassword}>
          <Text size="sm" color="#868E96">
            Forgot Password?
          </Text>
        </Pressable>
        <Pressable style={styles.button} onPress={submitLogin}>
          {isLoading ? (
            <ActivityIndicator size="small" color="#fff" />
          ) : (
            <Text style={styles.buttonText}>Login</Text>
          )}
        </Pressable>
      </KeyboardAvoidingView>
      <View style={styles.signUpButton}>
        <Pressable onPress={openRegister}>
          <Text>
            Don't have an account?{" "}
            <Text style={styles.signUpText}>Sign up</Text>
          </Text>
        </Pressable>
      </View>
    </View>
  );
};

const styles = StyleSheet.create({
  container: {},
  forgotButton: {
    alignSelf: "flex-end",
    marginBottom: 16,
    marginTop: -6,
  },
  button: {
    alignItems: "center",
    backgroundColor: "#000",
    padding: 10,
  },
  buttonText: {
    color: "#fff",
  },
  signUpButton: {
    marginTop: 32,
    alignItems: "center",
  },
  signUpText: {
    color: "#427FD1",
  },
});

export default LoginForm;
useLogin hook is used to manage the login form state and to submit the login form. useNavigationActions hook is used to navigate to other pages.
Refer to the useLogin and useNavigationActions hooks for more information.
- Register the
LoginFormcomponent in thesrc/blocks/index.jsfile.
import LoginForm from "../components/user/LoginForm";

const blocks = [
  {
    name: "appmaker/login-form",
    View: LoginForm,
  },
];

export { blocks };
Create a page file named
LoginPage.jsin thesrc/pagesfolder.Add the following code to the
LoginPage.jsfile.
import { appSettings } from "@appmaker-xyz/core";

const appmakerImages = appSettings.getOption("appmakerImages");

const LoginPage = {
  type: "normal",
  title: "Login",
  attributes: {
    renderType: "normal",
    renderInScroll: true,
    rootContainerStyle: {
      flex: 1,
      backgroundColor: "#FFFFFF",
    },
    contentContainerStyle: {
      flex: 1,
    },
    scrollViewContentContainerStyle: {
      justifyContent: "center",
      padding: 12,
      flexGrow: 1,
    },
  },
  blocks: [
    {
      name: "appmaker/appImage",
      attributes: {
        style: {
          width: 200,
          height: 60,
          alignSelf: "center",
          resizeMode: "contain",
          marginBottom: 18,
        },
        src: appmakerImages.loginLogo,
      },
    },
    {
      name: "appmaker/login-form",
      attributes: {},
    },
  ],
};

export default LoginPage;
appmaker/appImage block is used to render the an image. appmakerImages is used to get the app logo image url. You can use the appmakerImages object as mentioned in the above example to get the app logo image url, which is uploaded in the appmaker dashboard.
- import the
LoginPagepage in thesrc/pages/index.jsfile.
import LoginPage from "./LoginPage";

const pages = {
  LoginPage, //name of the page should remain as LoginPage
};

export { pages };
- Check whether the login page is replaced with the custom login page.
Steps to replace the forgot password page
Create a component named
ResetPasswordForm.jsin thesrc/components/userfolder.Add the following code to the
ResetPasswordForm.jsfile.
import React from "react";
import {
  StyleSheet,
  KeyboardAvoidingView,
  Pressable,
  ActivityIndicator,
  Text,
  View,
} from "react-native";
import Icon from "react-native-vector-icons/Feather";
import { useNavigationActions, useForgotPassword } from "@appmaker-xyz/shopify";
import { InputFormItem } from "./form-block/InputFormItem";

const ResetPasswordForm = ({ onAction }) => {
  const { control, isLoading, submit, isSuccess } = useForgotPassword({
    defaultValues: {
      email: "",
    },
  });
  const { openLoginPage } = useNavigationActions();

  if (isSuccess) {
    return (
      <View style={styles.container}>
        <Icon name="check-circle" size={40} color="#064E3B" />
        <Text style={styles.largeText}>Reset Link Sent</Text>
        <Text style={styles.title}>
          We've sent you an email with a link to update your password. Please
          check your inbox.
        </Text>
        <Pressable style={styles.button} onPress={openLoginPage}>
          <Text style={styles.buttonText}>Back to Login</Text>
        </Pressable>
      </View>
    );
  }

  return (
    <View style={styles.container}>
      <Text style={styles.largeText}>Reset Password</Text>
      <Text style={styles.title}>
        Enter your email address below and we'll send you a link to reset your
        password.
      </Text>
      <KeyboardAvoidingView behavior="padding">
        <InputFormItem
          keyboardType="email-address"
          textContentType="emailAddress"
          style={styles.input}
          control={control}
          name="email"
          placeholder="Email"
        />
        <Pressable style={styles.button} onPress={submit}>
          {isLoading ? (
            <ActivityIndicator size="small" color="#fff" />
          ) : (
            <Text style={styles.buttonText}>Reset Password</Text>
          )}
        </Pressable>
      </KeyboardAvoidingView>
    </View>
  );
};

const styles = StyleSheet.create({
  container: {},
  title: {
    marginBottom: 32,
    color: "#4f4f4f",
  },
  largeText: {
    fontSize: 32,
    color: "#212121",
  },
  button: {
    alignItems: "center",
    backgroundColor: "#000",
    padding: 10,
  },
  buttonText: {
    color: "#fff",
  },
});

export default ResetPasswordForm;
useForgotPassword hook is used to manage the forgot password form state and to submit the forgot password form. useNavigationActions hook is used to navigate to other pages.
Refer to the useForgotPassword and useNavigationActions hooks for more information.
- Register the
ResetPasswordFormcomponent in thesrc/blocks/index.jsfile.
import ResetPasswordForm from "../components/user/ResetPasswordForm";

const blocks = [
  {
    name: "appmaker/reset-password-form",
    View: ResetPasswordForm,
  },
];

export { blocks };
Create a page file named
ForgetPassword.jsin thesrc/pagesfolder.Add the following code to the
ForgetPassword.jsfile.
const ForgetPassword = {
  type: "normal",
  title: "Reset Password",
  attributes: {
    rootContainerStyle: {
      flex: 1,
      backgroundColor: "#FFFFFF",
    },
    contentContainerStyle: {
      flex: 1,
      paddingHorizontal: 12,
      justifyContent: "center",
    },
  },
  blocks: [
    {
      name: "appmaker/reset-password-form",
      attributes: {},
    },
  ],
};
export default ForgetPassword;
- import the
ForgetPasswordpage in thesrc/pages/index.jsfile.
import ForgetPassword from "./ForgetPassword";

const pages = {
  ForgetPassword, //name of the page should remain as ForgetPassword
};

export { pages };
- Check whether the forgot password page is replaced with the custom forgot password page.